19 - 20 화는 벡터, 삼각함수 등 기본 강의라서 생략함.
- Resource 와 파생 클래스 간단 설계.
// CResource.h
#pragma once
class CResource
{
private:
    wstring m_strKey;               // 리소스 키
    wstring m_strRelativePath;      // 리소스 상대 경로

public:
    void SetKey(const wstring& _strKey) { m_strKey = _strKey; }
    void SetRelativePath(const wstring& _strRelativePath) { m_strRelativePath = _strRelativePath; }

    const wstring& GetKey() const { return m_strKey; }
    const wstring& GetRelativePath() const { return m_strRelativePath; }

public:
    CResource();
    virtual ~CResource();
};
리소스는 키 값과 상대 경로를 가짐.
// CTexture.h
#pragma once
#include "CResource.h"
class CTexture :
    public CResource
{
private:
    HDC m_hDC;
    HBITMAP m_hBitmap;

public:
    void Load(const wstring& _strFilePath);

public:
    CTexture();
    virtual ~CTexture();
};
텍스쳐는 이를 상속받아 추가로 DC 랑 BITMAP 을 가진다.
void CTexture::Load(const wstring& _strFilePath)
{
    // IMAGE_BITMAP은 비트맵 이미지를 로드하는 데 사용됩니다.
    // LR_LOADFROMFILE 플래그는 파일에서 이미지를 로드하도록 지정합니다.
    // LR_CREATEDIBSECTION 플래그는 DIB 섹션을 생성하여 이미지 데이터를 메모리에 저장하도록 지정합니다.
    m_hBitmap = (HBITMAP)LoadImage(nullptr, _strFilePath.c_str(),
        IMAGE_BITMAP, 0, 0, LR_LOADFROMFILE | LR_CREATEDIBSECTION);

    assert(m_hBitmap && "CTexture::Load : LoadImage Failed");
}
win32 api 에서 LoadImageW 라는 함수를 호출하여 이미지 파일을 로드함.
- 프로젝트 빌드 구조 설계.
비주얼 스튜디오에서 프로젝트를 우클릭 > 속성 > 일반 을 클릭.
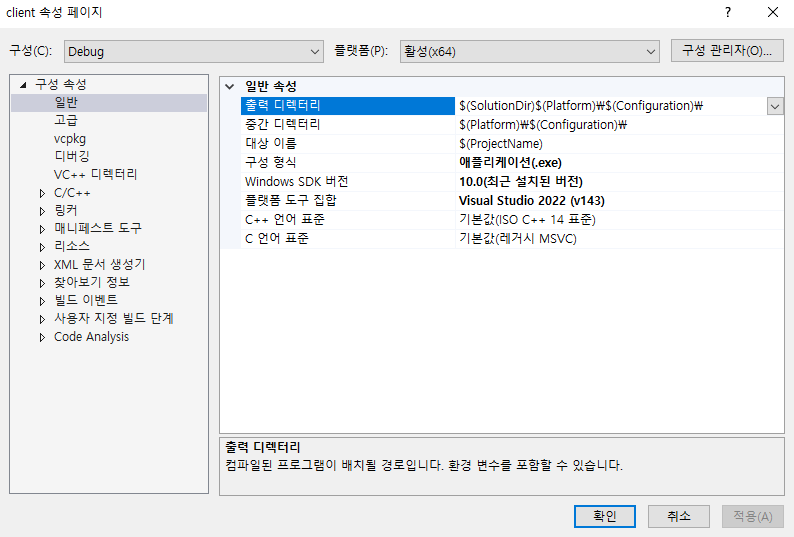
출력 디렉토리의 값을
Debug 일 때 $(SolutionDir)Output\bin_debug\
Release 일 때 $(SolutionDir)Output\bin\
으로 설정하고 저장.
기존의 솔루션 디렉토리에 있던 x64 라는 빌드 폴더는 지워줘도 됨.
새롭게 빌드해보면
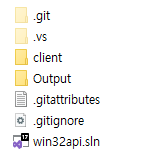
이름이 달라진 Output 폴더에 빌드가 됨.
실제 빌드하여 배포한다고 했을 때, release 버전 빌드 폴더인 bin 에 리소스가 있어야 함.

해당 폴더에 content/texture/ 와 같은 형태로 리소스들을 저장한다.
- Path 값 얻기.
PathManger 클래스를 만들고
// CPathMgr.h
#pragma once
class CPathMgr
{
    SINGLETON(CPathMgr);
private:
    wchar_t m_szContentPath[255];   // 윈도우에서 경로값은 최대 255자.

public:
    void init();
};
// CPathMgr.cpp
void CPathMgr::init()
{
// 현재 작업 디렉토리를 가져와서 m_szContentPath에 저장.
GetCurrentDirectory(255, m_szContentPath);
SetWindowText(CCore::GetInstance()->GetMainHwnd(), m_szContentPath);
}GetCurrentDirectoryW 함수로 실행 파일이 실행 중인 경로를 가져옴.
이제 빌드한 뒤 이전에 만든 Output > bin 폴더의 실행 파일을 직접 실행해보자.

근데 이걸 비주얼 스튜디오에서 실행하면

Output 폴더가 아니라 프로젝트 폴더로 나옴.
이건 다시 비주얼 스튜디오에서 설정을 바꿔줘야 함.
프로젝트를 우클릭 > 속성 > 디버깅 > 작업 디렉토리를 바꿔준다. Debug 랑 Release 둘다 바꿔줘야 함!

원래 $(ProjectDir) 로 되어 있음.
이렇게 바꿔주면 비주얼 스튜디오에서도 실제 빌드 파일 버전으로 테스트 가능.
bin\content 폴더에 접근하기도 한결 수월하다.
// CPathMgr.cpp
void CPathMgr::init()
{
    // 현재 작업 디렉토리를 가져와서 m_szContentPath에 저장.
    GetCurrentDirectory(255, m_szContentPath);

    // 제일 오른쪽 '\' 위치 찾기
    wchar_t* pFind = wcsrchr(m_szContentPath, L'\\');

    if(pFind)
        *(pFind + 1) = '\0'; // '\' 다음 위치에 null 문자 삽입하여 문자열 종료.

    // m_szContentPath 뒤에 "bin\content\" 문자열 추가.
    wcscat_s(m_szContentPath, 255, L"bin\\content\\");

    SetWindowText(CCore::GetInstance()->GetMainHwnd(), m_szContentPath);
}
이제 PathManager 의 init 함수에서 현재 경로를 가져온 다음,
상위 폴더로 이동하면 항상 Output 폴더가 나옴. 여기다가 bin\content\ 를 붙여주면
상대 경로를 계산해서 항상 content 폴더의 절대 경로를 알아낼 수 있다.

Output 폴더를 바탕화면으로 빼내와도 content 폴더의 경로를 잘 알아오는 것을 확인. 빌드를 배포할 수 있는 단계가 되었다.
- 텍스처 로드 테스트
// CScene_Start.cpp
void CScene_Start::Enter()
{
    // Texture 로딩하기.
    CTexture* pTexture = new CTexture;
    wstring strPlayerTexturePath = CPathMgr::GetInstance()->GetContentPath();
    strPlayerTexturePath += L"texture\\test.bmp";
    pTexture->SetKey(L"Player");
    pTexture->Load(strPlayerTexturePath);
...
content\texture\ 폴더에 아무 이미지 파일 넣고 로드해보면 됨.
    // Manager Init
    CPathMgr::GetInstance()->init();

    CTimeMgr::GetInstance()->init();
    CKeyMgr::GetInstance()->init();
    CSceneMgr::GetInstance()->init();
다만 CCore::init 함수에서 SceneMgr 가 먼저 실행돼서 오류가 발생함. PathManager 를 먼저 초기화해서 일단 해결.
'Win32 api' 카테고리의 다른 글
| Win32 api 강의 24화. (0) | 2025.09.17 |
|---|---|
| Win32 api 강의 23화. (0) | 2025.09.16 |
| Win32 api 강의 17 - 18화. (0) | 2025.09.15 |
| Win32 api 15 - 16화. (0) | 2025.09.14 |
| Win32 api 강의 13 - 14화. (0) | 2025.09.14 |